Posts

Week Five: Lab Inspection Day & Poster

Image
Poster: Lab Inspection Day:

Week Three

Image
  Week Three Progress: A lot of time this week was spent trying to find ways to make the metal detector more sensitive. There were two main ways; increasing the number of turns in the coil, or increasing the current in the coil. For the time being, we decided to focus on increasing the turns in the wire as it was more accessible. We made many different coils so that we could test them and find out which would work best.  This week, we also made a basic chassis design for robot. It included holes so that the different componentsw of the robot could be attached to the chassis as well as a couple pieces that allow the front pair of wheels to be attached.    Problems/ Concerns:  Having a strong enough metal detecting circuit is a concern for the lab inspection day. We need to find a way to mount the actual coil to the chassis.  Plan for Week Four:  By the end of next week, we need to have a fully functional metal detecting robot. This means that the metal ...

Week Two

Image
  Week Two Progress: In this session we continued work on the metal detecting circuit. This involved lots of research on which type of metal detecting circuit to use and how to make the coil strong enough to detect metal objects beneath it. We decided to use a pulse generating circuit rather than a low frequency type circuit since... We also made progress with writing the metal detector code for the arduino so that it could interpret information it was gathering from the metal detecting coil. We started work on the chassis design. A decision needed to be made on whether to use 3D printing or simple laser cutting for the bulk of the chassis. The chassis has some basic requiremtns. It needs to have enough space for all of the components as well as a way to attach the components to the chassis. There also needs to be enough space between the front and back pair of wheels as well as amount of clearance between the bottom of the robot and the surface that its driving on, so that it can ...

Week One

Image
  Purpose of Project: We will be designing and making a metal detecing, obstacle avoiding robot. The robot will be able to move along a set path and avoid any obstacles in that path. The robot will have the ability to detect any metal object that it drives over and will then alert the user of the objects presence using a buzzer. The robot will be controlled using an arduino which we will program.  Main Components:   Arduino Uno - The brain of the robot. Interfaces with the other components. Dual H-Bridge Motor Driver Module - Controls the two motors. Geared Motors - Used to move the robot. Ultrasonic Distance Sensor - Used to detect incoming obstacles . Buzzer - Used to indicate when the robot detects a metal object. Insulated Wire - Used in making the metal detector coil. Chassis - Every other component gets mounted to the chassis sop that the robot is one ocherent piece.  Week One Progress: This week time was spent on figuring out how to use the arduino, how to pro...

Week Four

Image
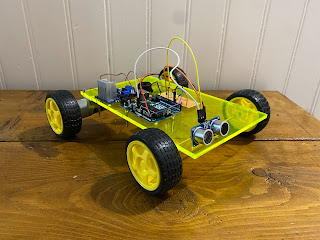
   Week Four Progress: This week was focused on making one cohesive piece. We did more work on the metal detector coil. We needed to flatten the coil so that there weren't any parts of the wire overlapping, as well as increasing the number of turns. This was to increase the strength of the magnetic field. By doing this, the metal detecting coil was able to detect metal objects from much further away. We're currently working with a coil with 24 turns   We put the robot together and tested the object avoidance.   Plan for Week Five: